How to Make Almond Milk at Home
Prep Time: 15 minutes Cook Time: 12 hours
I’ve learned to include non-dairy milk in many of my favorite classic recipes over the years, including my original macro cookie recipe, and have developed a love for the many different varieties.
I’m happy to share a classic & simple almond milk recipe that will teach you the fundamentals of nut-milk making. Once mastered, the recipe can be altered to experiment with other nuts, spices & consistencies. (I often cut the water in half to make an almond paste that I use in many pastries). Truly the sky is the limit!
I hope you enjoy this classic recipe & share your own personal varieties with us in the comments below!
Ingredients
- 4 cups filtered water
- spices/seasonings to taste: (vanilla, sea salt, cinnamon, cacao).
- 1 cup raw almonds
Directions
1. Measure out one full cup of raw almonds and place into a large bowl that will house both the nuts & filtered water, let soak for a minimum of 12 hours, not to exceed 48 hours. (The longer you soak your almonds the smoother and richer the almond milk will become).
2. After soaking, rinse & clean the almonds to eliminate any loose skin / debris that might have accumulated in the water while soaking.
3. After draining & washing the almonds, pour the nuts into a high speed blender or food processor. Both will work fine, but a food processor will take a bit longer.
4. Pour in two fresh cups of filtered water to the blends, as well as any spices you’d like to add to your milk. (I’m quite partial to a dash of cinnamon, cardamom & sea salt).
5. Once everything is nestled inside of your blender / food processor, blend all ingredients on high for 8 - 10 minutes. While this might seem long, I find that this length of time is optimal for producing the smooth & creamy milk texture we all know!
6. After blending, you should be left with a thick paste like mixture that is comparable to a grainy dough.
7. Once blended to an even consistency, we’ll begin to separate the ‘milk’ from the remaining almond bits, which is referred to as almond meal’. You can save & repurpose your almond meal to use in homemade granola recipes or throw into your morning smoothie for an extra boost of fiber & protein. You can also dry & convert your almond meal into a gluten free flour alternative.
*(We’d love to share a part II, to this recipe to explain how to create your own GF flour, let us know in the comments if this is of interest).
8. Back to the recipe… Begin to pour portions of the mixture into either a cheese cloth / tea towel/ tightly woven cloth, laid over a large bowl to begin to strain your mixture. If you’re concerned about large almond chunks ending up in your final product, you can also place a strainer within your bowl as a second filtration.
9. Be sure to squeeze & ring out all of the liquid from each section to ensure you’re getting as much almond milk out of your original batch. (I often will revisit the previously strained almond meal a second time to ensure I’ve fully dried out my ‘dough’.
10. At this point you should be left with a sizeable bowl of fresh homemade almond milk. Be sure to pour your mixture into a sealable container to store & cool within your fridge. - (You’ll notice a bit of separation after a few hours, which is normal as we haven’t used any bonding agents within our milk. Simply shake thoroughly before consuming & be sure to use your milk within 2-3 days.
How to Make Almond Milk at Home
https://www.gomacro.com/recipes/homemade-almond-milk/
2019-04-06T17:07:33
I’ve learned to include non-dairy milk in many of my favorite classic recipes over the years, including my original macro cookie recipe, an…
PT15M
PT12H
Baking
4 cups filtered water
spices/seasonings to taste: (vanilla, sea salt, cinnamon, cacao).
1 cup raw almonds
PT15M
PT12H
Baking
4 cups filtered water
spices/seasonings to taste: (vanilla, sea salt, cinnamon, cacao).
1 cup raw almonds
Measure Out One Full Cup …
Measure out one full cup of raw almonds and place into a large bowl that will house both the nuts & filtered water, let soak for a minimum of 12 hours, not to exceed 48 hours. (The longer you soak your almonds the smoother and richer the almond milk will become).
After Soaking, Rinse & Clean …
After soaking, rinse & clean the almonds to eliminate any loose skin / debris that might have accumulated in the water while soaking.
After Draining & Washing The …
After draining & washing the almonds, pour the nuts into a high speed blender or food processor. Both will work fine, but a food processor will take a bit longer.
Pour In Two Fresh Cups …
Pour in two fresh cups of filtered water to the blends, as well as any spices you’d like to add to your milk. (I’m quite partial to a dash of cinnamon, cardamom & sea salt).
Once Everything Is Nestled Inside …
Once everything is nestled inside of your blender / food processor, blend all ingredients on high for 8 - 10 minutes. While this might seem long, I find that this length of time is optimal for producing the smooth & creamy milk texture we all know!
After Blending, You Should Be …
After blending, you should be left with a thick paste like mixture that is comparable to a grainy dough.
Once Blended To An Even …
Once blended to an even consistency, we’ll begin to separate the ‘milk’ from the remaining almond bits, which is referred to as almond meal’. You can save & repurpose your almond meal to use in homemade granola recipes or throw into your morning smoothie for an extra boost of fiber & protein. You can also dry & convert your almond meal into a gluten free flour alternative.
*(We’d love to share a part II, to this recipe to explain how to create your own GF flour, let us know in the comments if this is of interest).
Back To The Recipe… Begin …
Back to the recipe… Begin to pour portions of the mixture into either a cheese cloth / tea towel/ tightly woven cloth, laid over a large bowl to begin to strain your mixture. If you’re concerned about large almond chunks ending up in your final product, you can also place a strainer within your bowl as a second filtration.
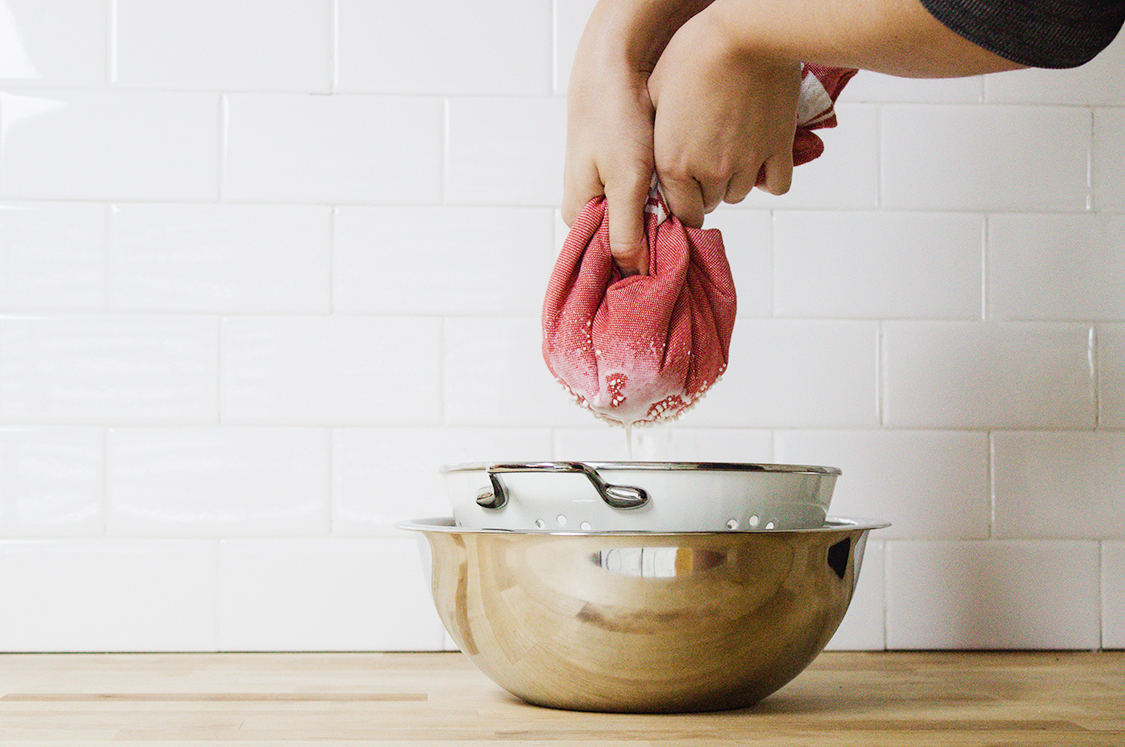
Be Sure To Squeeze & …
Be sure to squeeze & ring out all of the liquid from each section to ensure you’re getting as much almond milk out of your original batch. (I often will revisit the previously strained almond meal a second time to ensure I’ve fully dried out my ‘dough’.
At This Point You Should …
At this point you should be left with a sizeable bowl of fresh homemade almond milk. Be sure to pour your mixture into a sealable container to store & cool within your fridge. - (You’ll notice a bit of separation after a few hours, which is normal as we haven’t used any bonding agents within our milk. Simply shake thoroughly before consuming & be sure to use your milk within 2-3 days.
GoMacro